Summary of this post
Want to update the font-size, font-family (for the Chinese character) and color settings for my hexo blog. Done some searching and find out the contents in base.styl and Pisces.styl needs to be modified to fullfil my requirements.
I know this may not be the best choice (since NexT’s docs suggests using Alternate Config ,_config.next.yml, to apply modification) while at least this works…😣
為了修改字體尺寸、字型(主要是中文字體)與版面顏色設定,調整了base.styl與Pisces.styl的內容。
只需要修改英語字型的話,更改_config.next.yml中# Font Settings的段落即可。
Environment
hexo: 5.3.0NexT: 8.2.1os: Windows_NT 10.0.18363 win32 x64Modification in base.styl
File path: \themes\next\source\css\_variables
Color system
// Color system// --------------------------------------------------$whitesmoke = #F5F3ED;$blue = #ADBDC4;Set Isabelline (#F5F3ED) for $whitesmoke, and use Opal (#ADBDC4) to replace the default $blue.
Color scheme reference: elegant-and-classic
Text color
// Global text color on <body>$text-color = $black-dim;Change the text color from $black-light to $black-dim, lower the color value to make the contents more readable.
Font family
Chinese font family setting
// Font families.$font-family-chinese = 'Noto Sans TC';沒有特別喜歡 NexT 預設的中文字型 PingFang SC 與 Microsoft YaHei,決定更換成 Google 的 Noto Sans TC。
將$font-family-chinese的值改成Noto Sans TC後,到Google Fonts選取要使用的字體。
取得 host URI 後,將_config.next.yml中host的值設定為 Google Fonts 提供的 URI。
English font family setting
English font can be easily config in _config.next.yml, just update the “Font Settings” part.
# ---------------------------------------------------------------# Font Settings# ---------------------------------------------------------------font:  enable: true  host: https://fonts.googleapis.com/css2?family=Noto+Sans+TC&family=Roboto&display=swap
  # Global font settings used for all elements inside <body>.  global:    external: true    family: Roboto    size:
⚗️ Anatomy:
- Set
external: trueto load the font family fromhost. - Go to Google Fonts to get the host URI for “Roboto”. 1. Search for the font family “Roboto” 1. Click ”+ Select this style” 1. Click the button “View your selected families” on the top-right side on the screen 1. Copy
link href, paste as the value for “host” key in_config.next.yml1. Here’s the screenshot for reference:
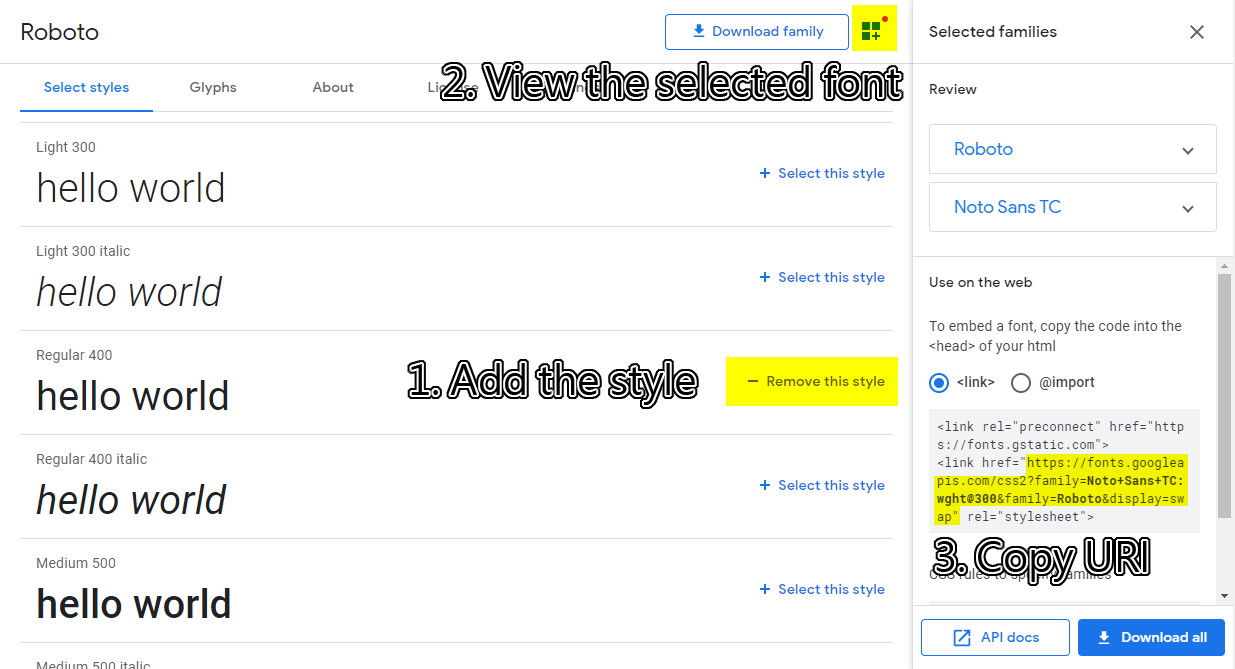
💡 Hint:
In my case, I also add “Noto Sans TC” to the selected families, so the host URI becomes to https://fonts.googleapis.com/css2?family=Noto+Sans+TC&family=Roboto&display=swap.
The URI includes two families “Noto Sans TC” and “Roboto”.
Font size
// Font size$font-size-medium = .95em;$font-size-large = 1em;$font-size-larger = 1.125em;$font-size-largest = 1.25em;Reduce the size scale for blog content and titles.
Modification in Pisces.styl
File path: \themes\next\source\css\_variables\Pisces.styl
Body background color
// Settings for some of the most global styles.// --------------------------------------------------$body-bg-color = #CFC9BD;Set the background color to Pastel Gray (#CFC9BD) to provide a slightly elegant smell (😂) to this blog. Color scheme reference: elegant-and-classic
Sidebar (menu) color setting
// Sidebar$sidebar-nav-hover-color = $blue;$sidebar-highlight = $blue;Change the hover and highlight color of “Table of Contents” into $blue:
Sidebar (menu) image setting
// Sidebar// --------------------------------------------------$site-author-image-border-width = 0px;I think the border around the blog author image creates a little bit conflict to the whole theme style (since the site-author-image seems to be the only place that appears the border). Removes the border by setting the $site-author-image-border-width to 0px.
Below is the before-after comprehensive:

覺得整體視覺上只有側欄的影像有加邊界反而不太協調,決定拿掉。