筆記總結
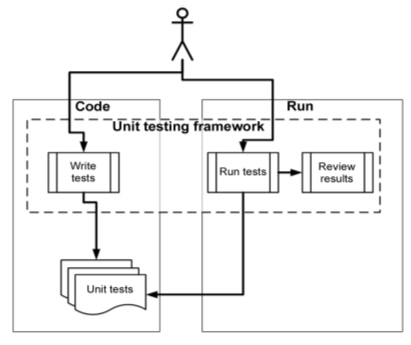
第二章介紹了測試框架 Jest 與撰寫單元測試的架構、命名技巧。也說明濫用 .beforeEach() 的副作用,以及如何透過工廠模式(factory method)來避免 .beforeEach() 的快龍肥大問題。
2.1 About Jest
2.2 The Library, the Assert, the Runner & the Reporter
Jest 實際上包含四種與測試有關的功能:
- 提供執行測試的 api (
describe,test,it) - 提供比對結果的 api (
expect) - 執行單元測試(a test runner)
- 提供測試結果(a test reporter)
2.3 What unit testing frameworks offer
相較於自己開發「負責執行測試的功能」,使用框架有以下好處:
- 框架提供 api 與說明文件,讓所有人都知道如何撰寫、修改測試
- 測試失敗時,主動提供錯誤棧(error stack)
- 反覆執行、設定自動執行的成本很低——這會讓工程師更願意執行測試
- 省去維護自架工具的時間,讓工程師把時間拿去為每一個單元寫測試
提醒:使用測試框架並不代表你會自動寫出好讀、好維護或有意義的測試。
2.4 Introducing the Password Verifier Project
以下是我們要為之撰寫單元測試的功能:
function verifyPassword(input, rules) {  const errors = [];
  rules.forEach((rule) => {    const result = rule(input);    if (!result.passed) {      errors.push(`error ${result.reason}`);    }  });
  return errors;}
2.5 The first Jest test for verifyPassword
2.5.1 The Arrange-Act-Assert (AAA) structure
指「先安排(arrange)環境,再執行(act)功能,最後驗證(assert)結果」的測試架構。此架構能讓工程師輕鬆理解一個測試的情境與目的。
test("badly named test", () => {  // arrange part  const fakeRule = (input) => ({ passed: false, reason: "fake reason" });
  // act part  const errors = verifyPassword("any value", [fakeRule]);
  // assert part  expect(errors[0]).toMatch("fake reason");});
2.5.2 Testing the test
如果把 errors.push() 這行註解掉,測試就會失敗——這證明該測試確實能檢驗一個單元的功能是否正常。
function verifyPassword(input, rules) {  const errors = [];
  rules.forEach((rule) => {    const result = rule(input);    if (!result.passed) {      // errors.push(`error ${result.reason}`);    }  });
  return errors;}
2.5.3 U.S.E naming pattern
好理解的單元測試名稱應包含以下三種要素:
- 測試哪一個單元(unit)?請指出該單元的名稱
- 測試情境(scenario)是什麼?
- 預期結果(expected behavior)是什麼?
這樣做的好處是:當測試失敗時,終端提供的會是失敗的測試名稱。命名包含 USE 三要素可以讓工程師馬上知道「哪個單元」在「什麼情境」的測試沒過。
調整名稱後的單元測試如下:
// unittest("verifyPassword, given a failing rule, returns errors", () => { // scenario const fakeRule = (input) => ({ passed: false, reason: "fake reason" }); const errors = verifyPassword("any value", [fakeRule]); // expected behavior expect(errors[0]).toContain("fake reason");});2.5.4 String comparisons and maintainability
文字是一種介面:它有可視、會隨著版面變形(換行)的特性。測試文字時,盡量使用彈性較高的比對 api 來確認核心內容是否有出現——比如 .toContain() / .toMatch()——避免少量的非重點內容更動都需要調整單元測試。
2.5.5 Using describe()
讓 describe() 描述被測試的單元(unit),讓 test() 描述情境(scenario)與預期結果(expected behavior):
describe("verifyPassword", () => { test("given a failing rule, returns errors", () => { const fakeRule = (input) => ({ passed: false, reason: "fake reason" }); const errors = verifyPassword("any value", [fakeRule]); expect(errors[0]).toContain("fake reason"); });});2.5.6 Structure can imply context
describe() 支援巢狀結構,所以還能進一步將單元測試的情境(scenario)也收納到 describe() 中:
describe("verifyPassword", () => { describe("with a failing rule", () => { // arrange, scenario const fakeRule = (input) => ({ passed: false, reason: "fake reason" }); test("returns errors", () => { // act const errors = verifyPassword("any value", [fakeRule]); // assert, expected behavior expect(errors[0]).toContain("fake reason"); }); });});如果一個單元有多個退出點(exit point),每一個退出點都該要有一個位於第二層 describe() 的測試。
2.5.7 The it() function
it() 與 test() 在 Jest 中是等價功能。硬要說的話—— it() 會讓測試讀起來比較自然。將本書章節 2.5.6 測試中的 test() 以 it() 取代後,會增加一點 BDD (behavior-driven development) 風味:
describe("verifyPassword", () => { describe("with a failing rule", () => { it("returns errors", () => { const fakeRule = (input) => ({ passed: false, reason: "fake reason" }); const errors = verifyPassword("any value", [fakeRule]); expect(errors[0]).toContain("fake reason"); }); });});BDD (behavior-driven development)
- 一種軟體設計方法論,鼓勵開發人員與產品經理、使用者等非技術人員合作
- 透過使用者故事(user story)與範例(example)來描述軟體行為
2.5.8 Two Jest Flavors
test() 與 it() 的差異主要是「單元測試讀起來的風格有所不同」。以 it() 開頭會讓測試讀起來更有「是人類在描述功能」的感受。
2.5.9 Refactoring the Production Code
如果我們將章節 2.5 的 verifyPassword 重構為物件導向風味的程式碼:
class PasswordVerifier1 {  constructor() {    this.rules = [];  }
  addRule(rule) {    this.rules.push(rule);  }
  verify(input) {    const errors = [];    this.rules.forEach((rule) => {      const result = rule(input);      if (result.passed === false) {        errors.push(result.reason);      }    });    return errors;  }}
會發現第二版的進入點(entry point)變成 addRule()、退出點(exit point)在 verify()——相較於第一版的 verifyPassword 其進入點與退出點都在同一個地方。
而第二版的單元測試會變成這樣:
describe("PasswordVerifier", () => {  describe("with a failing rule", () => {    it("has an error message based on the rule.reason", () => {      const verifier = new PasswordVerifier1();      const fakeRule = (input) => ({ passed: false, reason: "fake reason" });      verifier.addRule(fakeRule);
      const errors = verifier.verify("any value");      expect(errors[0]).toContain("fake reason");    });  });});
看起來沒什麼問題。
但如果我們想把「驗證錯誤訊息內容」「驗證 errors 陣列長度」拆為兩個單元測試的話,會發現一堆重複的內容(verifier / fakeRule / addRule):
describe("PasswordVerifier", () => {  describe("with a failing rule", () => {    it("has an error message based on the rule.reason", () => {      const verifier = new PasswordVerifier1();      const fakeRule = (input) => ({ passed: false, reason: "fake reason" });      verifier.addRule(fakeRule);
      const errors = verifier.verify("any value");      expect(errors[0]).toContain("fake reason");    });
    it("has exactly one error", () => {      const verifier = new PasswordVerifier1();      const fakeRule = (input) => ({ passed: false, reason: "fake reason" });      verifier.addRule(fakeRule);
      const errors = verifier.verify("any value");      expect(errors.length).toBe(1);    });  });});
這時候可以透過 beforeEach() 抽出共用的部分。
2.6 Trying the beforeEach() route
根據官方文件說明,在 describe() 中的 beforeEach() 會在每一個測試執行前被執行:
Runs a function before each of the tests in this file runs. If
beforeEachis inside adescribeblock, it runs for each test in the describe block.
而每次測試前都要建立的 verifier 實例、透過 .addRule() 注入規則——這些重複的佈局(arrange)工作可以移到 beforeEach() 中:
describe("PasswordVerifier", () => { describe("with a failing rule", () => { // arrange let verifier, fakeRule; beforeEach(() => { verifier = new PasswordVerifier1(); fakeRule = (input) => ({ passed: false, reason: "fake reason" }); verifier.addRule(fakeRule); }); it("has an error message based on the rule.reason", () => { // act const errors = verifier.verify("any value"); // assert expect(errors[0]).toContain("fake reason"); }); it("has exactly one error", () => { // act const errors = verifier.verify("any value"); // assert expect(errors.length).toBe(1); }); });});但重點來了——須知 Jest 的預設是同時執行多個測試,所以共用狀態(上方的 verified)可能會被意外覆蓋。
第一種解決辦法是在 cli 傳入 -i 選項來線性地進行測試(文件在此)。第二種是透過 2.7 會提到的工廠模式(factory method)來避免使用 beforeEach()。
2.6.1 beforeEach() and scroll fatigue
除了狀態有可能被意外污染之外,把 arrange 放到 beforeEach() 也會導致工程師「沒辦法只看 it() 就知道這個測試的全貌」。一旦單元 PasswordVerifier 的測試越來越多,工程師必須來回捲動滑鼠才能理解整份測試——本書作者稱之為捲動疲勞(scroll fatigue)。
另外,beforeEach() 會在日積月累下變成垃圾桶。工程師會把所有被共享的設定一股腦塞到這裡,也不管這些東西是真的被每一個測試依賴、還是只有部分測試會用到。設定越塞越多,接著就有不確定是否能刪掉的廢 code 出現了。
為了避免垃圾結局,請考慮使用接下來要介紹的工廠模式(factory mode)來取代 beforeEach()。
2.7 Trying the factory method route
工廠模式說穿了就是把重複性的佈局(arrange)部分抽出、變成獨立功能。比如以下範例的 makeVerifierWithPassingRule 與 makeVerifierWithFailedRule:
const makeVerifier = () => new PasswordVerifier1();const passingRule = (input) => ({ passed: true, reason: "" });const makeVerifierWithPassingRule = () => {  const verifier = makeVerifier();  verifier.addRule(passingRule);  return verifier;};const makeVerifierWithFailedRule = (reason) => {  const verifier = makeVerifier();  const fakeRule = (input) => ({ passed: false, reason: reason });  verifier.addRule(fakeRule);  return verifier;};
describe("PasswordVerifier", () => {  describe("with a failing rule", () => {    it("has an error message based on the rule.reason", () => {      // arrange      const verifier = makeVerifierWithFailedRule("fake reason");      // act      const errors = verifier.verify("any input");      // assert      expect(errors[0]).toContain("fake reason");    });    it("has exactly one error", () => {      // arrange      const verifier = makeVerifierWithFailedRule("fake reason");      // act      const errors = verifier.verify("any input");      // assert      expect(errors.length).toBe(1);    });  });  describe("with a passing rule", () => {    it("has no errors", () => {      // arrange      const verifier = makeVerifierWithPassingRule();      // act      const errors = verifier.verify("any input");      // assert      expect(errors.length).toBe(0);    });  });  describe("with a failing and a passing rule", () => {    it("has one error", () => {      // arrange      const verifier = makeVerifierWithFailedRule("fake reason");      verifier.addRule(passingRule);      // act      const errors = verifier.verify("any input");      // assert      expect(errors.length).toBe(1);    });    it("error text belongs to failed rule", () => {      // arrange      const verifier = makeVerifierWithFailedRule("fake reason");      verifier.addRule(passingRule);      // act      const errors = verifier.verify("any input");      //assert      expect(errors[0]).toContain("fake reason");    });  });});
使用工廠模式的優點是:就算只看每一個 it() 的內容,也能從幫忙執行佈局的功能名稱理解該測試的情境是什麼——這讓我們解決了捲動疲勞(scroll fatigue)的問題。
工程師無法從功能名稱知道「情境如何被安排」,但能理解「執行測試時,對應的情境是什麼」。以後也不需要把設定囤積到 beforeEach() 中。
2.8 Going Full Circle to test()
在改用工廠模式來安排測試內容後,其實連 describe() 都可以考慮刪掉,因為每一組 test() 都能說明自己的 Arrange-Act-Assert 與 U.S.E 分別是什麼:
const makeVerifier = () => new PasswordVerifier1();const passingRule = () => ({ passed: true, reason: "" });const makeVerifierWithPassingRule = () => {  const verifier = makeVerifier();  verifier.addRule(passingRule);  return verifier;};const makeVerifierWithFailedRule = (reason) => {  const verifier = makeVerifier();  const fakeRule = () => ({ passed: false, reason });  verifier.addRule(fakeRule);  return verifier;};
test("pass verifier, with passing rule, has no errors", () => {  const verifier = makeVerifierWithPassingRule();  const errors = verifier.verify("any input");  expect(errors.length).toBe(0);});
test("pass verifier, with failed rule, has an error message based on the rule.reason", () => {  const verifier = makeVerifierWithFailedRule("fake reason");  const errors = verifier.verify("any input");  expect(errors[0]).toContain("fake reason");});
test("pass verifier, with failed rule, has exactly one error", () => {  const verifier = makeVerifierWithFailedRule("fake reason");  const errors = verifier.verify("any input");  expect(errors.length).toBe(1);});
test("pass verifier, with passing and failing rule, has one error", () => {  const verifier = makeVerifierWithFailedRule("fake reason");  verifier.addRule(passingRule);  const errors = verifier.verify("any input");  expect(errors.length).toBe(1);});
test("pass verifier, with passing and failing rule, error text belongs to failed rule", () => {  const verifier = makeVerifierWithFailedRule("fake reason");  verifier.addRule(passingRule);  const errors = verifier.verify("any input");  expect(errors[0]).toContain("fake reason");});
2.9 Refactoring to parameterized tests
假設我們寫了一個帶有參數的功能:
const oneUpperCaseRule = (input) => { return { passed: input.toLowerCase() !== input, reason: "at least one upper case needed", };};並且我們想確認「不管參數的大寫位在一個單字的哪一個位置,該功能都能正確判斷單字是否符合『至少包含一個大寫字元』」的話,單元測試可以有至少三種寫法。
第一種:一個條件就是一組 test()。條件變化少的時候確實可以這樣玩,但之後 oneUpperCaseRule 如果更改了實作規格,就有一堆測試要調整。
describe("one uppercase rule", function () {  test("given no uppercase, it fails", () => {    const result = oneUpperCaseRule("abc");    expect(result.passed).toEqual(false);  });
  test("given one uppercase, it passes", () => {    const result = oneUpperCaseRule("Abc");    expect(result.passed).toEqual(true);  });
  test("given a different uppercase, it passes", () => {    const result = oneUpperCaseRule("aBc");    expect(result.passed).toEqual(true);  });});
第二種:使用 Jest 的 test.each() 一口氣傳入所有情境。相較於第一種測試的撰寫方式,現在少了很多重複的部分。
describe("one uppercase rule", () => { test("given no uppercase, it fails", () => { const result = oneUpperCaseRule("abc"); expect(result.passed).toEqual(false); }); test.each(["Abc", "aBc"])("given one uppercase, it passes", (input) => { const result = oneUpperCaseRule(input); expect(result.passed).toEqual(true); });});describe("one uppercase rule", () => { test.each([ ["Abc", true], ["aBc", true], ["abc", false], ])("given %s, %s ", (input, expected) => { const result = oneUpperCaseRule(input); expect(result.passed).toEqual(expected); });});第三種:使用 JavaScript 原生的 Object.entries 來為每一種條件跑測試。
describe("one uppercase rule, with vanilla JS for", () => { const TEST_CASE = { Abc: true, aBc: true, abc: false, }; for (const [input, expected] of Object.entries(TEST_CASE)) { test(`given ${input}, ${expected}`, () => { const result = oneUpperCaseRule(input); expect(result.passed).toEqual(expected); }); }});寫測試的方法有很多種,能顧及維護性與可讀性的就是好辦法。
2.10 Checking for expected thrown errors
拉回 PasswordVerifier1 的例子。假設我們在 verify() 追加了檢查 this.rules 的功能:
class PasswordVerifier1 {  constructor() {    this.rules = [];  }
  addRule(rule) {    this.rules.push(rule);  }
  verify(input) {    // add this line    if (!this.rules.length) {      throw new Error("There are no rules configured");    }
    const errors = [];    this.rules.forEach((rule) => {      const result = rule(input);      if (result.passed === false) {        errors.push(result.reason);      }    });    return errors;  }}
當我們想要確認「沒有設定 this.rules 的話,執行 this.verify() 應該拋出錯誤」時,可以使用 Jest 的 .toThrowError() 來檢查是否有拋錯、錯誤訊息是否符合預期:
test("verify, with no rules, throws exception", () => { const verifier = makeVerifier(); expect(() => verifier.verify("any input")).toThrowError( /no rules configured/, );});避免使用 .toMatchSnapshot()
使用 .toMatchSnapshot() 無法讓人一眼就看出該測試的預期結果是什麼。如果真的需要為測試保留快照,請考慮使用 .toMatchInlineSnapshot() 明列預期結果:
it("renders correctly", () => { const tree = renderer .create(<Link page="https://example.com">Example Site</Link>) .toJSON(); expect(tree).toMatchInlineSnapshot(` <a className="normal" href="https://example.com" onMouseEnter={[Function]} onMouseLeave={[Function]} > Example Site </a> `);});2.11 Setting Test Categories
Jest 目前並不支援「將測試分類,並執行特定類別(例:單元、整合測試)的測試」。不過工程師能透過以下方式達成「依類別跑測試」的需求:
- 讓不同類別的測試有其命名模式或收納資料夾
- 在
jest.config.js中透過 testRegex 或終端指令--testPathPattern=<regex>來指定執行特定名稱規則的測試